
Photography : ISO, aperture + shutter speed
ISO 100, f1.8, 1/6400 (late on a very sunny afternoon)
Now that you have let go of the fear surrounding the M mode on your camera, it’s time to explain the three main settings that ultimately work together to create a photo. Whilst this is a technical post I honestly believe that the best way to learn is to pick up your camera, play with the settings and take hundreds of photos. Don’t rely solely on instructions; the best photos are taken by a photographer who has, in his or her own way, developed an intuitive approach to taking photos; essentially, the camera is an extension of the photo taker.
When you first take the leap onto manual mode, set aside a good hour to take photos. Ideally, you want to shoot in the early morning or late afternoon (for those of us with daylight savings, early evening is good, too) as the light is more forgiving at this time. Remember that one good photo out of 100 shots is commendable; don’t set your expectations to high.
When I’m setting up a shot on my camera, I adjust the settings in the following order:
ISO
ISO basically measures your camera’s sensitivity to light. Essentially, the lower the ISO (ISO100) the less sensitive your camera is, the higher the ISO (ISO8000) the more sensitive. So, during the day when you’re shooting outside, you would generally set your ISO to 100 (the lowest setting). Indoor photography on a sunny day usually requires ISO400 and if you’re shooting in low-light conditions, you would need to go even higher. However, the higher the ISO, the more grain you’ll get in your photo (unless you’re shooting on a top-of-the-range camera). Indeed, low light capabilities are one of the most alluring aspects of expensive cameras (and it’s one of the main reasons I upgraded from the GF1).
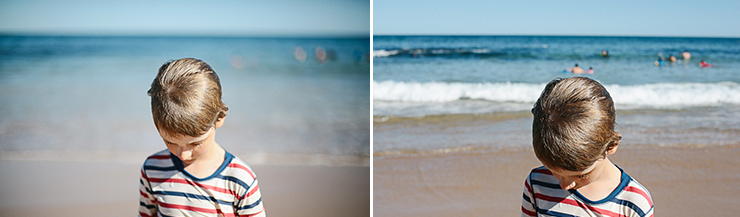
Aperture
Aperture also controls the depth of field which is essentially the degree of blur behind your subject. As you can see below, I shot two photos of Che at the beach using two different aperture settings. A larger aperture setting – f1.4 on the left- will isolate the subject in the foreground and blur the background whereas a smaller aperture setting – f7.1 on the right – will bring the foreground and background into focus.
Shutter Speed
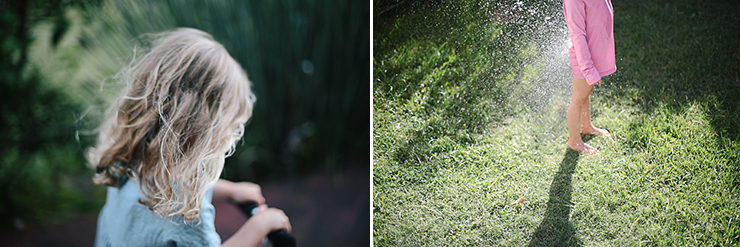
Shutter speed is essentially the exposure time; the length of time the camera’s shutter is open to light. I wouldn’t recommend shooting under 1/125 (of a second) unless you’re using a tripod (or have very steady hands). This is particularly applicable if you’re photographing people, especially wriggly children. Generally, a slow shutter speed will capture movement as a blurred motion but a fast shutter speed will freeze action with the upmost clarity.
As you can see below, a slow shutter speed of 1/640 has captured Poet on her scooter as “motion blur” where as a fast shutter speed of 1/2000 has frozen the water droplets from the garden hose.
There’s a little bar in your viewfinder or on your screen that measures shutter speed – it’s called your light metre. Ideal exposure is measured at “0” – an under exposed shot will be measured at “-1” or “-2” whereas an overexposed shot will be measured at “+1” or “+2”
But light exposure is a highly subjective matter. Ultimately, you control the look of your images by under exposing or over exposing, depending on whether you prefer a light-filled capture or a darker, moodier vibe.
ISO + Aperture + Shutter Speed
Notice that I’ve mention light a lot? Essentially, ISO, aperture and shutter speed work together to create your ideal lighting conditions.
When I’m setting up a shot, I’ll do the following:

ISO 100, f1.4, 1/640 (outside in early afternoon sun)

ISO 100, f2.0, 1/4000 (outside in midday sun)

ISO 500, f1.8, 1/250 (inside in the early morning)
I am in no way an expert at technical photography. Instead, I’ve explained these settings as I understand them – I hope it’s been helpful! If you have any questions please ask them in the comments section.

This is an excellent post! So well put together! Thank you!
Absolute pleasure x
Yes finally a post that is clear and makes sense. BTW I waited and waited to have a girl and name her Acacia, I have loved this name since I first found it 17 yrs ago. I have never heard or met anyone with this amazing name until now, so of course I have to say something. 5 children (boys) later and still not able to use the name😉 oh well I still have a chance with grand daughters right😄
this is so helpful! I've read articles on these three tons of time, but your explanation as well as examples and suggestions really help- thank you!
That's a lovely thing to say. Happy I could help x
thank you!! lovely post!!
absolute pleasure x
Thank you – so helpful and such a lot to think about!
So much to think about but really, it's just a series of steps x
This was really, really well explained Jodi. I've got a pretty good grasp on ISO, aperture and shutter speed but think you explained this perfectly. It's really great when talented photographers open up more specifically about their photos and their desired styles. Thanks heaps! 🙂 xx
Thank you! x
It's great to get the technical stuff in such an easy to understand way. I've started saving for the DSLR camera and can't wait to start trying things out. I'm particularly impressed not just with the clarity of the shots but the way it makes the water look alive. Thank you so much for this series.
Happy to help x
Ooo thank you for the helpful and clear post Jodi, I've been waiting for it 😉 Strangely, I can't seem to get my aperture below f3.5 despite fiddling with the other two settings (I have my first DSLR, a Nikon D3300), does this seem normal? I'd love to know if you ever use the flash or do you use the settings so no flash is needed? Thanks again for the advice x
Pleasure! It sounds like you're using a lens with a maximum aperture of f3.5 (it will have it written on the side of the lens eg. 50mm 3.5). Investing in a lens that has a high aperture is always a good idea as it maximises your photography options.
I have never, ever used a flash. I only shoot in natural light, hence I never need a flash x
It is so kind (and very cool) when artists share their knowledge. You photograph such amazing and inspirational photos you could teach an online photo class! Thanks for the easy to understand tips and excellent photos examples.
I'm glad they were useful x
Thanks a million times, dear Jodi!
pleasure x
Do you edit your photos after taking them?
Thanks again!
Yes, often I do. I'll talk a bit about editing in a future post x
Really enjoyed reading this, and I think I really got for the first time! Can't wait to try to use this knowledge. Thank you so much!
I am curious, aren't you afraid of "loosing" moments by only shooting in natural light? I have some really bad photos of some precious moments, and I love them…
Perhaps what you need to understand about the camera I use is that its low-light capabilities are pretty extraordinary. I never really take photos at night anyway (we're usually tucked up in bed quite early) so a flash is never necessary. I only ever use natural light because I'm not interested in adding extra equipment or fiddling around with technology too much (silly, I know, but I don't want to take the joy out of photography).
With the right camera and the right settings you can use natural light (regardless of how little there is) to your full advantage. And if, for any reason, we're out and about at night and there's not enough light, I simply enjoy the moment instead of dwelling on the fact that I may have missed photographing it x
I've been waiting for this little guide ever since you hinted at it, and it exceeded all of my expectations! I was worried it was going to be too technical and altogether over my head just as virtually every other photo guide I've read has been, but you did an excellent job breaking down all the information into an easily understandable format. Here's hoping I'm able to apply all the great stuff I've just learnt! So cool of you to share, thanks!
Lovely feedback. Thank you! x
So helpful! NOW all I need is a better lens : on 18-55mm here so -f3.5-5.6 range 🙁
A new lens really will make all the difference, I promise x
Jodi – I love your blog and your photography has inspired me to take mine up a notch 🙂 I have the canon 50mm/1.4 lens but it seems like I can never get the shutter speed fast enough for the light I shoot in. Do you I should make the switch to a full frame so the sensor is bigger and captures more light? Did this make a big difference in your photography? thanks:)
Yes, I think the full frame sensor really does make a huge difference. The Canon 6D is a great camera as it is full frame and light and you can often find it for around $1500 x
I am shooting with a Canon Rebel t2i – so not the best camera out there but decent. I just can't decide if I should upgrade my camera or get a 35 mm/f1.4 lens. I do love the full-frame look that your pictures have. decisions, decisions . . .
Thanks, that does help, I kind of knew what each of them was, but I didn't know what settings to use, at least now I know where to start! Now to experiment…
May I ask what lens you are using in these photos? Is it a 50mm? Thanks for sharing.
Yes, a 50mm 1.4 x
So, so very helpful! Thank you!
I know I will come back to this post again and again.
And I can't wait to get my camera out tomorrow and play around.
Jodi… you need to do more workshops, lovely lady! You have a way of putting things in a conversational and easy-to-understand way – a must for those trying to learn. Technical terms like this are hard to pick up when you're trying to figure them out for the first time. I'm sure this will become a welcome resource 🙂
A beginner in photography, I found this post very helpful and easy to understand. I really enjoy looking at your photos for inspiration. Looking forward to your tips on editing.
Sooo helpful, thank you 🙂
Thank you so much!!! You just did my day, everything make sense now 🙂
This has become my go-to guide! Thank you thank you!!!
Thanks for these very useful tips!
Very easy to understand article, i so love the photos, here are some Nikon D3300 accessories and lenses take a look for upgrade your D3300.
It's so easy to understand!
Hey guys a big thanks to who posted this because I'm 13 and doing my photography o-level and this helped me alot thx guys
Hi i have bought Nikon d3300 but i don't know the right setting to the aperture its confusing i use the regular lens which is 18-55mm but when i search about the setting of the aperture they say f numbers doesn't appear in my camera like f 2.8 or 1.8 so could u plz help…
Try checking ur mode dial and see if its on M (manual).
thanks u helped so much i just bought the d3300 and now im really getting used to it. 😀
What a coincidence most of the people have Nikon D3300s like i do.
Hi
I have just bought nikon D7000 with 18-55 and 70-300 lense.
Is it a good choice?
SleepEEE is a nonsurgical vision correction procedure that provides both corrective and preventive benefits, especially for our children. It uses the science of orthokeratology (Ortho-K) to correct your vision . lasik enhancement
Thank you for this wonderful easy to understand explanation!!! I'm looking to purchase a good camera that will last me a while and want to make the best choice. I am comparing the 60d to the 6d. The 60d isn't full frame, but is compatible with many lenses. I you mentioned the 6d. What lense would you suggest starting with for the 6d. I'm going to be photographing candid shots of my children in similar settings to yourself. Thank you for your help!
This was a huge help! I did have a question however. I am unable to lower my aperture below a F3.5, do you have any insight into why this might be?
Super helpful, thank you for taking the time!